


Have you ever thought about adding a personalized touch to your wooden kitchen utensils?
While these tools are useful and helpful in our everyday lives, it’s also fun to add some fun aesthetics to them.
In this article, we’re showing you an easy and simple way to customize your wooden cutting boards with a marker.
Scorch Marker is Non-Toxic and Food Safe
The Scorch Marker is a unique crafting tool.
It allows you to burn permanent designs into wood, canvas, denim, and other mediums.
It’s also totally non-toxic and completely safe to use on surfaces designed for food.
This means that your Scorch Marker cutting board is not only nice to look at, but can also be used for making and serving delicious food.
Materials You Will Need:
-
Vinyl Stencil
-
Towel
-
Sandpaper

How to Wood-Burn Your Cutting Board
The great thing about this project is that it doesn’t require many supplies at all!
A cutting board, your Scorch Marker, and a heat gun are the most essential.
If you’ve never used the Scorch Marker before, we recommend practicing on a few pieces of scrap wood first.
This gives you the chance to experiment a bit before moving on to your big, final project.
1. Sand Your Cutting Board to 500-Grit
Once you’re ready to begin customizing your cutting board, start by getting the surface nice and smooth.
The smoother, the better.
This step helps prevent your design from bleeding, and also gives your vinyl stencil an easy surface to adhere to.
We recommend 500-grit because that’s been the most successful for us, but some pieces may do just fine at 220.

2. Apply Your Stencil Firmly
The Scorch Marker can be applied with most stencils, including those made of paper, plastic, and silk screen.
But, because we have a Cricut machine, vinyl stencils are our favorite.
No matter what material you use for your stencils, make sure to apply it firmly to your wood. A card scraper or similar tool is helpful here.
 3. Color Your Design
Now, get artistic!
You can apply the Scorch Marker liquid in one of two ways: the marker nib or the removable foam brush.
It’s mostly up to preference, but the brush can be useful for covering larger projects.
The most important tip to remember here is to only apply a thin, even layer of the liquid.
Too much liquid increases the risk of a bleeding design and nobody wants that!
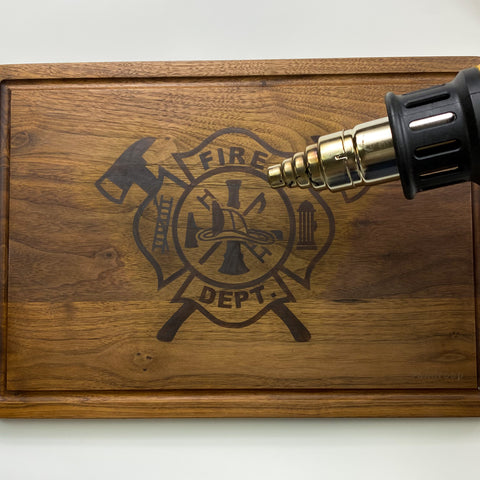
4. Watch the Magic
Allow your design to dry for a minute or two before removing the stencil.
While this is happening, you can begin preheating your heat gun.
We recommend a heat gun that is at least 1500 watts, but a toaster oven at 350F can also get the job done.
Once your design has dried, you can remove the stencil and apply your heat.
A sweeping motion is recommended, and after a minute or two, you will begin to see the color change appear before your eyes.

5. Finish it Off
With Scorch Marker, you have the creative freedom to burn your design as dark as you’d like.
You can even apply a gradient-like effect to your designs!
Once you’ve finished burning though, it’s important to apply a seal.
On a cutting board, a wood finish is helpful for protecting your design from wear and tear, scuffing, and general damage.
We love using Odie’s Oil for all our designs on wooden utensils, as it’s completely non-toxic and easy to apply.
Scorch Marker is the Perfect Tool for Kitchen Crafts
The Scorch Marker really is the best crafting tool to have on hand.
It can help you create projects that are long-lasting, meaningful, and different than anything else you’ve created.
And, if you’re looking for some inspiration, download some stencils on our website for free with the code ‘ilovestencils’ at checkout.
We can’t wait to see what you create!


Lisa
December 16, 2022
Can you ise the pen on a board that was already treated with mineral oil?